Setting up WebDav for iPads on Server 2008 or 2012

WebDav – How to install and configure on Server 2008 R2

These screenshots were taken from a fresh installation of server 2008 R2 (Standard) with no roles or features added.

1. On the Start menu, click Start, point to Administrative Tools, and then click Server Manager. In the Server Manager Hierarchy pane, expand Roles, and then click Web Server (IIS).

image

Click Next, Next.

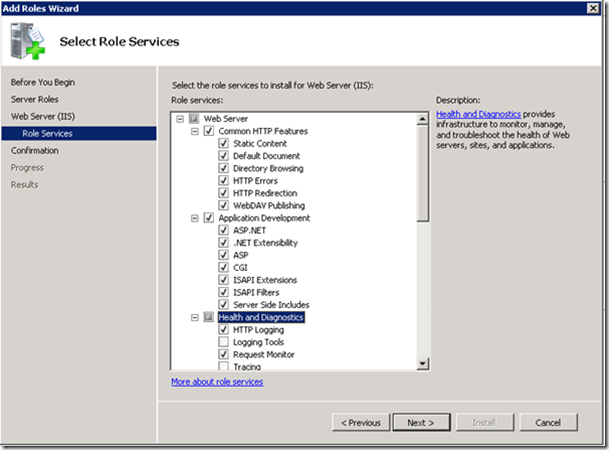
2. Select the following boxes.

image

3. Scroll down and also tick:

image

4. Click Next, then Close when you get to this screen.

image

5. Add in the Desktop Experience feature

image

image

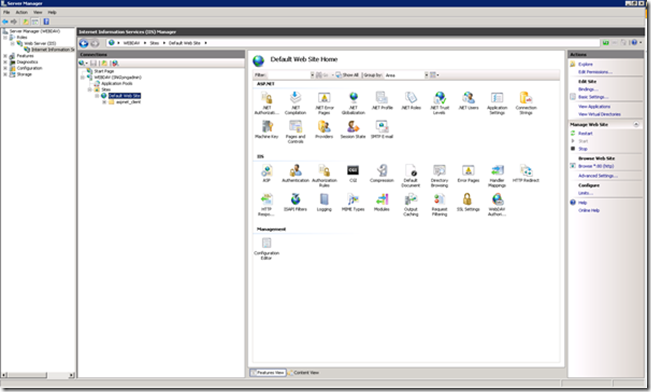
6. Under Server Manager you can now Expand the Default Website to see both the ASP.NET and IIS components.

image

7. Double click on Webdav Authoring Rules

image

8. Select ENABLE WEBDAV

image

9. Click ADD AUTHORING RULE

image

Select as below

image

10. Under your server site, double-click IIS Authentication.

image

11. Disable Anonymous and enable Windows Authentication

image

12. Create a folder on your network (preferably on the webdav server) to store your files.

Create a service-account on your network that has full rights to the folder.

Give that account full access to the folder.

For Demo purposes I created a C Drive folder called WebDav and a service account called WEBDAV_SERVICE on the domain).

image

13. Double Click Authorisation Rules

image

14. Add an Allow rule

image

image

15. Right-click Application Pool and select ADD APPLICATION POOL

image

16. Give it a name and settings to same as below:

image

17. On the Web Application you just created, select ADVANCED SETTINGS

image

18. Click the Identity to be used (ApplicationPoolIdentity), then select Custom Account ‘SET’ and enter the name of the service account you created.
(I have put Domainname where your domain name should go)

image

19. Right-click Default Website and select ‘Add Virtual Directory’.

image

20. Now tell the website where the folder for your files is and the alias you would like it to be known as. I called it ScottCloud.

image

21. Test Settings but Ignore this error.

image

22. Right click on your new virtual directory and choose convert to application

image

23. Choose Select and then select the Application you created.

image

24. Click OK then TEST SETTINGS.

image

25. Highlight your new application and select advanced settings and change physical path credentials logon type to NETWORK and click ok.

image

26. Highlight your new site and double click directory browsing.

image

27. Click ENABLE.

image

Your webdav site is now available for use. You may have to turn off the server firewall/make an exception for Webdav.

Firewalls and external access

Your webdav server will work in your own network.

My internal server IP address is 192.168.100.107

The webdav folder alias is scottcloud.

In Windows all I have to do is map a network drive http://192.168.100.107/scottcloud

In my iPod/iPad/iPhone connected to my internal network, when asked for the webdav address I use the same http://192.168.100.107/scottcloud.
On an IOS device you only need to enter your username and password to save to that folder.

But you want it to work externally? Why not.

The real fun begins here. For this step you need to know about your firewall.

My firewall manages 16 public IP addresses. My firewall listens to them all. I set up a NAT (Network Address Translation) so that when I type in a public IP address outside my office (which points to my Watchguard) the Watchguard hears the request and passes the information on to my Internal server http://192.168.100.107.

Ipads/iPods/iPhones and WebDav

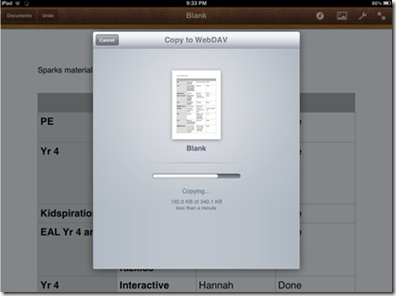
IOS Apps (e.g. in this case Pages) allows saving too WebDav. Here is how I saved to WebDav.

image

image

image

image

Other Apps allow browsing of the WebDav folders (WebDavNav)

image

Windows

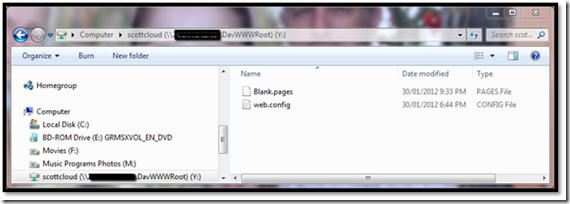
In Windows you can map a drive letter to the webdav folder and treat it like a standard Windows folder.

image

When you first log in, you must include the domain name before your username.

image

Once you have mapped the folder, you can add that location to favourites.

imageimage

Personal Folders through WebDav

Most schools allow students a personal storage area on their file servers that is securely backed up. The folders are created by a script or when the user is created (Active Directory).

To make these available through webdav,

a) Create a new folder on your webdav server called Personal

b) On AD, when new users are created, point the path of the personal folders to the WEbdav server’s PERSONSL folder. All permissions should be created correctly as well.

c) Go back to Point 17 and create the PERSONAL folder as a Virtual Directory.

There are tools that will create personal folders for every user on your Domain Controller easily.

Hint: if you are using iPads to save editable files to WebDav

Some filetypes are blocked from opening. You need to add them to MIME Types list in IIS:

For Explain Anything files, Run the IIS Manager, add the extension xpl in the MIME Types:

image

Restart IIS and the problem will be resolved.

We also encountered another problem while downloading epub files. Using the method above can also resolve the problem.

Posted in Uncategorized | Leave a comment

Idiot Guide to Powershell Part 2 (O365 Exchange)


Can’t be bothered typing in your credentials every time you connect? include your credentials in the script (password and admin email account in red)

# Connect to Outlook Set-ExecutionPolicy RemoteSigned
$Password = ConvertTo-SecureString ‘password‘ -AsPlainText -Force
$Cred = New-Object System.Management.Automation.PSCredential(“mailmaster@xxx.com“, $Password)
$s = New-PSSession -ConfigurationName Microsoft.Exchange -ConnectionUri https://ps.outlook.com/powershell -Credential $cred
-Authentication Basic -AllowRedirection
Import-PSSession $s


Commands – the following lengthy list of commands is broken into the following areas:

  • Users (creating, set passwords, policies, setting permissions etc…)
  • Distribution Groups (every script you could possibly want to manage these groups)
  • Email management (deleting, searching, setting email policies, retention settings)
  • External Contacts – important for managing parent emails in a school
  • Shared Mailboxes

Users

Users – create a new user

Users accounts are required to be created in the Office 365 Admin page https://login.microsoftonline.com – not in the Exchange Management console.

While you can create the accounts using Powershell, the easiest way to do this is to upload a CSV file of all users.

The User Creation page has a sample CSV file to download so you don’t stuff it up. Just add your user details.image

Licence Types

image

Connect Powershell to Admin Portal

The Admin Portal is different to Exchange Portal:

To manage users in Office365 Admin Portal via Powershell, you need to run a short script to connect you to that Admin Portal.

For a full list of Admin Portal CMDLETS go to: http://technet.microsoft.com/en-us/library/jj151815.aspx#BKMK_connect

You need to run this connection command and log in using the same admin account.

$msolcred = get-credential
connect-msolservice -credential $msolcred
Adding a user

New-MsolUser -UserPrincipalName Scott.Johnson@schoolname.edu.sg -DisplayName “Scott Johnson” -FirstName “Scott” -LastName “Johnson”

(This just adds a user and gives you a temporary password – – it doesn’t apply a licence for any of the four services Exchange, Lync, Sharepoint or Office Web Apps)

Adding a user and applying a licence:

First you need to know the licences that you have.

Run this command to list both your school’s name and the licence types you have to offer:

Get-MsolAccountSku

image


Command to add suer and apply a licence:

New-MsolUser -UserPrincipalName Scott.Johnson@schoolname.edu.sg -DisplayName
“Scott Johnson” -FirstName “Scott” -LastName “Johnson” -UsageLocation “sg”
-LicenseAssignment “schoolnamecom:STANDARDWOFFPACK_STUDENT”

UsageLocation refers to the country the licence will be used in – to find these countries go here:

http://www.iso.org/iso/country_names_and_code_elements

User Attributes Using Powershell

You can include a whole set of fields and attributes when creating users including useful stuff like department, phone number etc…

This website lists all the fields you can include when creating a new User: http://technet.microsoft.com/en-us/library/dn194096.aspx

The full set is like this (but you may never use them all)
Where it lists STRING, you must have text. If the text has spaces the text must be surrounded by ‘ ‘
Boolean must be either $false or $true.

New-MsolUser -DisplayName <string> -UserPrincipalName <string> [-AlternateEmailAddresses <string[]>] [-BlockCredential <Boolean>] [-City <string>] [-Country <string>] [-Department <string>] [-Fax <string>] [-FirstName <string>] [-ForceChangePassword <Boolean>] [-ImmutableId <string>] [-LastName <string>] [-LicenseAssignment <string[]>] [-LicenseOptions <LicenseOption[]>] [-MobilePhone <string>] [-Office <string>] [-Password <string>] [-PasswordNeverExpires <Boolean>] [-PhoneNumber <string>] [-PostalCode <string>] [-PreferredLanguage <string>] [-State <string>] [-StreetAddress <string>] [-StrongPasswordRequired <Boolean>] [-TenantId <Guid>] [-Title <string>] [-UsageLocation <string>] [<CommonParameters>]

Users – licences – Export a list of users and their licence types

Get-MsolUser -all | select DisplayName, Licenses >C:\userlicense.txt

Posted in Uncategorized | Leave a comment

Managing Office 365 through Powershell

I first started using Live@Edu in 2009 when I employed a company in Singapore to create 2000 student email accounts. At the time we were gearing up to add student accounts to our own Exchange 2007 server.
The cost of the hardware (4 servers set up in HA) and two storage enclosures was extreme.
Live@Edu gave us what we wanted and the space we needed.

At the start of 2012 I migrated 400 staff accounts to Live@Edu as well.

Since then I have migrated four more schools.

In 2013 the upgrade to Office 365 happened. Not without some bugs and angst but overall, it works.

It has taken me a long time to build this document. Hours of searching through multiple websites looking for the right command that worked with the right iteration of Powershell. Below are a large list of commands with examples that every school O365 manager should be able to use.  I hope you find it equally as useful.

Idiot Guide to PowerShell

Microsoft online services module for windows powershell. Download from following link:
http://technet.microsoft.com/en-us/library/jj151815.aspx

32-bit:
http://go.microsoft.com/fwlink/p/?linkid=236298

64-bit:
http://go.microsoft.com/fwlink/p/?linkid=236297

Logging in to O365 in PowerShell

First off log in using this line to load the special Active Directory Commandlets:


import-module MSOnline
$msolcred = get-credential
connect-msolservice -credential $msolcred


To manage your Exchange 2013, use this set of credentials


$LiveCred = Get-Credential
$Session = New-PSSession -ConfigurationName Microsoft.Exchange -ConnectionUri
https://ps.outlook.com/powershell/ -Credential $LiveCred -Authentication Basic –AllowRedirection Import-PSSession $Session


Note this:
Names of users or groups, if they contain spaces (e.g. Year 4 Parents) need to be enclosed in quotation marks (e.g. “Year 4 Parents”)

Running Scripts on your machine – you can download and run many long scripts. To give yor computer permission to run scripts you need to read this:

https://www.cogmotive.com/blog/powershell/allowing-powershell-scripts-to-execute

Script Centre at MS – repository of very useful scripts: http://gallery.technet.microsoft.com/scriptcenter/site/search?f%5B0%5D.Type=RootCategory&f%5B0%5D.Value=Exchange


Commands

Users – create a new user

This is presuming an email address of scott.johnson@example.com, the first name of ‘Scott,’ and the last name of ‘Johnson’

NEW-MSOLUSER –userprincipalname scott.johnson@example.com -DisplayName ‘Scott Johnson’ –Firstname ‘Scott’ –Lastname ‘Johnson’


(MORE TO COME LATER

Posted in Uncategorized | Tagged , , , , , , | Leave a comment

Outlook – how to conditionally format text of emails

1. Select the VIEW tab in Outlook
1

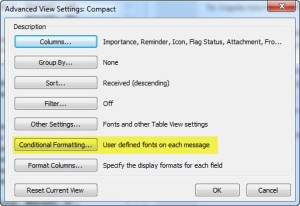
2. Select CONDITIONAL FORMATTING

2

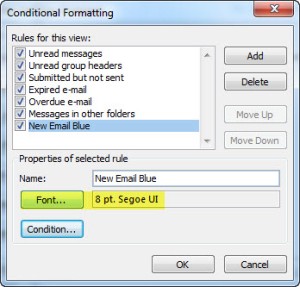
3. Click ADD and name the rule.

3

Under condition select the conditiond you want. This one selects all unread emails.

4

Select the font-type you want to apply to unread.
This rule will make all unread emails appear BLUE Century Gothic.

56

Apply the ruke by clicking OK


Posted in Uncategorized | Leave a comment

Convert mp3 to iTunes ringtone

  1. Right-click an itunes song and select Get infoimage
  2. Select Options then tick the START TIME and STOP TIME boxes. Select the length of your ringtone.
    image
  3. Select OK when you have chosen the length and then right-click and select Create AAC version. ITunes then creates a  version the length you input.

image

4. Copy the new short version to desktop and undo the start/stop time on the original. You can delete the 30 second version in iTunes.

5. Rename your m4a file to an m4r.

imageimage

6. Double-click the new file and it should play in iTunes and appear in your ringtones folder

image

7. Sync your phone and select the new ringtone.

Posted in Uncategorized | Leave a comment

Sharepoint 2010 Day 3

Editing a Master Page

When removing controls (e.g. Search Box or Site Logo)

Controls like Site Logo are just there to put an image in the page that can be controlled by the user. Permanently on the page but changeable buy site manager.

Controls on the page can be cut and pasted into the hidden section of the page (customised masterpage)

Creating and Applying Page Layouts

How do you override the left-hand navigation?


How do you input a video?


image

image


image

image

I fyou know the class or ID in a Sharepoint page, you can create a CSS page to edit and change that class or ID (as demonstrated above here).

Customising a Page Layout (Only in Publishing Sites)

If a page layout has a single image and  you want a second image in that layout:

Add a column to the page layout(Site Settings>Site Content Types>create new.

Edit in Sharepoint Designer after you have added the extra database column for a second image.

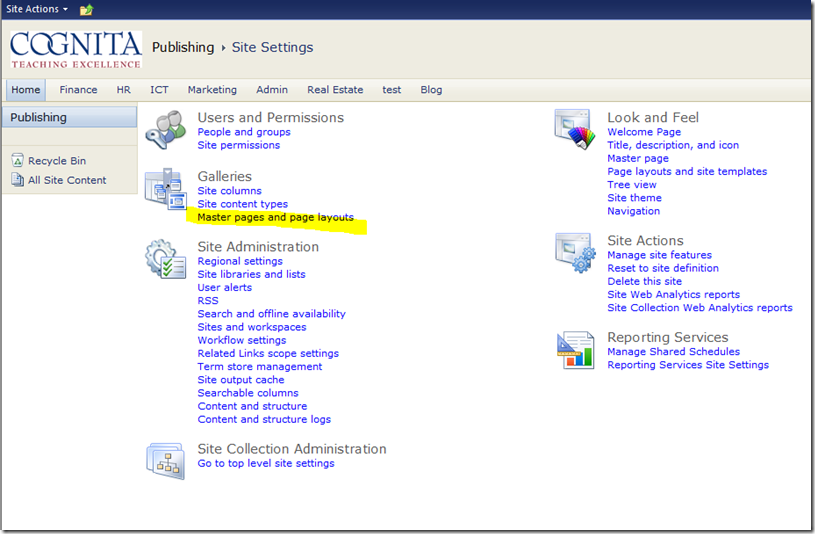
Site Settings>Master Page and Page Layouts> publish the new page as major versions.

Page Layouts also need> SIte Settings>Lookand Feel>Page Templates and Site Templates: you have to set Page Layouts setting to : Can use all layouts

Design a Page Layout from Scratch

image

image


To enable Silverlight on the Enterprise Server

Ratio of column size: 62%/38%

image

Set location of CSS file to relative for any Page:

<SharePointWebControls:CssRegistration name=”<% $SPUrl:~SiteCollection/Style Library/Synergy_CSS/SynergyHome.css %>” runat=”server”/>

Teamsite is OK for news – Blog is good for news.

Creat a page layout fo rnews with editable

Creat a new list.

Custom list with a new column called nwews content’

Mulitp line of text.

Enhanced rich text.

Create new date column fr news date

On Homepage (where this list is). edit frontpage. Insert webpart with newsfeed

Customise look of newsfeed. Sharepoint designer. Edit the NEwslist in SD – edit the view of the list.

Delete the top line with titles of columns.

Make the Newscontent as wide as the whole box. Delete the column on the left.


Code for CSS to customise top-level buttons. Defines the classes used in Sharepoint’s Master Pages that control navigation. See Unit 6.

/*Navigation*/
.s4-tn li.static .menu-item-text{
    padding:3px 2px;
    font-size:1.0em;
    font-weight:normal;
}
.s4-tn li.static{
    background: url(“../Synergy_Images/button_border.png”) no-repeat;
}
.s4-tn li.static > a.menu-item{
/* [ReplaceColor(themeColor:”Dark2″)] */ color:white;
white-space:nowrap;
margin:6px 5px 0px 5px;
display:inline-block;
height:28px !important;
background: url(“../Synergy_Images/button_unselected.jpg”) repeat-x;
border-top:0px;
}
.s4-tn li.static > a.menu-item:hover
{
/* [ReplaceColor(themeColor:”Accent1″)] */ color:white;
    background: url(“../Synergy_Images/button_selected.jpg”) repeat-x;
    text-decoration:none;
}
.s4-toplinks .s4-tn a.selected{
    color:#286581;
    height:37px;
    background:none;
    border:none;
}
.s4-search{
    margin-top:0px;
    padding:10px 40px 0px 0px !important;
}
.navigation{
    float: right;
    margin:26px 10px 0px 5px;   
    min-width:700px;
    height:37px;
}
.navigation_wrapper{
    float:right;
    width:725px;
    height:74px;
    }
.body #s4-topheader2
{
    border-style: none;
    border-color: inherit;
    border-width: medium;
    float: right;
    background: url(“../Synergy_Images/left_image_long.jpg”) no-repeat;   
        vertical-align:middle;
        min-height:37px;
    }
.s4-tn{
    padding:0px 10px 0px 10px;
    margin:0px;
    background: url(“../Synergy_Images/nav_right_image.jpg”) no-repeat 100% 0%;
    border-color:#0f680c;
    }
/*End Navigation*/


CSS Code fro background images for main body of the Sharepoint page.


/*Main content*/
.MasterContent{
    width:830px;
    height:513px;   
}

.right_master {
    background: url(“../Synergy_Images/rightbackgroundright.jpg”);
    width: 10px;
    height:513px;
    float:right;   
}
.left_master {
    background: url(“../Synergy_Images/tree.jpg”);
    float:left;
    height:513px;
    width:161px;
}
.s4-ca{
background:transparent url(“../Synergy_Images/rightbackgroundpixel.jpg”);
float:left;
margin-left:0px;
margin-right:0px;
min-height:513px;
width:659px;
}
/*End Main content*/

/*There is a need to remove any other .s4-ca code as it conflicts with this one*/

Posted in Uncategorized | Leave a comment

Sharepoint 2010 Design Workshop Day 2

Milan and Matthew

[[Goal for today – create a branded Masterpage]]

What is the CSS to remove the sidebar and have a central area only with bar.  
   

Publishing and Non-Publishing sites – differences

1. Publishing sites have content approval and version control of pages and documents

2. Reusable content (e.g. footer)

3. Has a PAGES folder in which site pages are stored.

Chapter 4 – SharePoint Designer

Modify Masterpages, Page Layouts and Content pages.

Add SharePoint sites or subsites

Can connect to an external database.

Set who can use Sharepoint Designer?

Web Application Level: Central Administration>General Administration Settings>Sharepoint Designer option –

Site Level: Site Actions>Site Collection Administration>Sharepoint DDesigner Settings

Pages can be edited and removed form hierarchy of Masterpages but will no longer inherit CSS or Style changes.

Pages customized are said to be removed from the site definition

Designer allows more webparts to be installed into pages that web view

SharePoint Lists  (using Sharepoint Designer) – Project Tasks – very good way of tracking tasks Gantt style

CSS

w3schools.com – CSS testing page to trial CSS

Site Settings>Site Theme

All themes can be downloaded as THMX files and edited in PPT. Save the theme in PPT and upload and apply to Sharepoint.

CSS

P{padding: 3px; color:#003;}

P.specialpara{color:#002;}

Html would look like this:

<p>Text</p>

<p class=”specialpara”>text</p>


www.csszengarden.com

IE8 and above have a Developer Tool to view CSS.

Corev4.css

Do not modify this CSS file.


If you want to overwrite a style: add

body{font:arial!important;} \\no font in the body. Body tags apply to ALL tags in the body. H1, H2, H3 etc… anywhere where the font tag appears it will be overwritten by Body !important

How to Apply a CSS file to Sharepoint.

Different CSS sheets will manage different parts of a page e.g. mainpage.css, menu.css, tables.css

Master Page Alternate CSS File

How to remove elements from a SharePoint site (like the ‘Like It’ idiot tage on top right)
Without actually changing the master page, you add a CSS file to it that makes visibility

1. Locate the class used to display the idiot tags

create a new css file in notepad with this in it. Call it nosocial.css

.ms-socialnotif-container {display:none;}

Upload the css file to STYLE LIBRARY/newfolder (found under all site content – root folder).

2. Under site settings>Look and Feel>masterpage>specify a CSS file (specify alternate CSS file). Find the CSS file.


Applying a CSS file to Sharepoint

image

Synergy_design.CSS

body {
    background-image: url(‘../Synergy_Images/img_bkg_wind.jpg’);
    background-repeat:no-repeat;
    }

.s4-ca  {
    background-image: url(‘../Synergy_Images/MainArea_BG.png’);
    }
   
    #s4-workspace {
    width: 812px !important; 
    padding-left: 167px;
    }


Copy and paste a new Master page.

Rename the file MyMaster. Customise and apply to sites.

Check in images for logo or not everyone can see it.

Important Points for changing BODY of a site

1. don’t make changes to the scrolling feature of the body container  (S4-bodycontainer) onwards.

2. Navigation of a site. How to style the TABS across the tops.

<Sharepoint:AspMenu tags


Master pages – download from Randy Drisgill. He has a starter masterpage. Simple.

<asp:panel visible=”false” runat=”server”>

Location of CSS file can be changes in a Master page

<SharePoint:CssRegistration name=”<% $SPUrl:~SiteCollection/Style Library/Synergy_CSS/Synergy.css %>”  After=”corev4.css” runat=”server”/>

Posted in Uncategorized | Leave a comment

SharePoint Design Class | April 23rd–27th 2012


Questions

Summary Link Web Part Not in SP Foundation
Workflows  
SharePoint Designer  
External Database Connectors  


Content Management

Using metadata

Governance

Corporate data has grown

How do we do content management across all the information we are tracking?

Entire company will become content managers

Site collections and Sites – differentiation

Site Collections must be created in Central Admin and may contain multiple sites (each inheriting permissions and Style from the Site Collection Master Page).

Subsites

e.g. portal.cognitaschools.sg/ICT

Subsites can have different masterpage applied to them

Site Collections appear to the right of  /sites/

/sites/ – this implies a site collection of the Web Application portal.cognitaschools.sg

Site Templates

Masterpage is only applied to the pages in the Pages folder of a publishing site.


Different types of pages

Publishing pages – static content. Publishing pages URL are kept in the Pages directory.

Non-publishing pages are kept in the sitepages URL
Wiki Pages
Web Part Pages

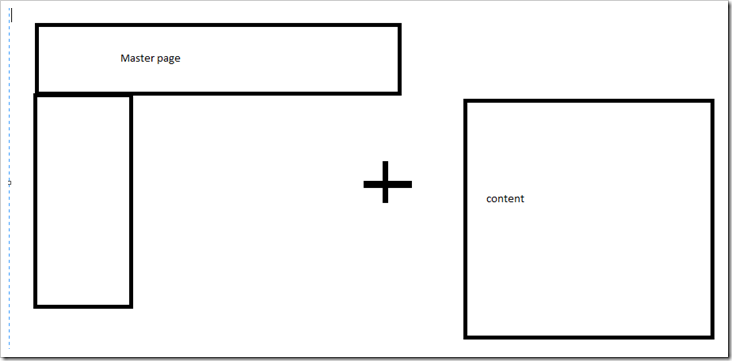
Master Pages

image

Master Page Elements can be removed (Toggle visibility)

Elements of a Master Page can control position and visibility of elements.

Site Settings > Look and Feel

(Don’t change the system master page) If you deploy one that breaks, it can’t be undone

image

image

Design pages are content pagesimage

Global Navigation (Tabs across top)

Current Navigation (left-hand side)

Security

Trusted or Intranet Zones – add your Portal.cognitaschools.sg to remove the explorer view additional password entry

Audience Settings

You can use SharePoint Groups for audience settings or define audiences under Central Admin

Creating Views

Adding WebPart Pages

image

Javascript for displaying Java in HTML source:

<script language=”javascript”>

function Custom_AddDocLibMenuItems(m, ctx)

{

var strDisplayText = “Send Link By Email…”;

var strAction;

var strImagePath = “”;

// parse the URL out of the itemTable

var URL = “”;

var index = itemTable.innerHTML.indexOf(“href=”);

if (index > 0)

{

  var str = itemTable.innerHTML.substr(index + 6);

  index = str.indexOf(‘”‘);

  if (index > 0)

  {

    URL = str.substr(0, index);

  }

}

if (URL != “”)

{

  strAction = ‘window.navigate(“mailto:%20?subject=Please review this document and offer your feedback…&body=<‘ + URL + ‘>”)’;

  // Add menu item

  CAMOpt(m, strDisplayText, strAction, strImagePath);

  // add a separator to the menu

  CAMSep(m);

}

return false;

}

</script>

HOST+Fn+Backspace to enter Virtualbox on OSX

Reusable content only on publishing site


Posted in Uncategorized | Leave a comment

Best Chicken Rice in Singapore

After 8 years here and two daughters (one who was born into Chicken Rice) we have found probably the best place in Singapore.

Chicken Rice house 255 Upper Thomson Road. In the middle of a row of shop houses.

As of yesterday it cost only $4.00 chicken Rice per person, $4.00 for Baby Kai Lan, $4.00 for Fried Tofu and Sweet Chilli Sauce. Lime Juice $1.40 glass.

Rice is done really well, skinless Breast-meat. Flavoursome and delivered with huge bowls of tasty clear chicken soup.

IMG_1821

Posted in Food Review | Leave a comment

IPad BBC Motion gallery

educational video footage. 70 years of BbC content. Use this to create your own content. http://www.bbcmotiongallery.com

Khan maths academy YouTube

Www.sapuratie.com/cmg

Posted in Uncategorized | Leave a comment